QGIS Plugin
![]()
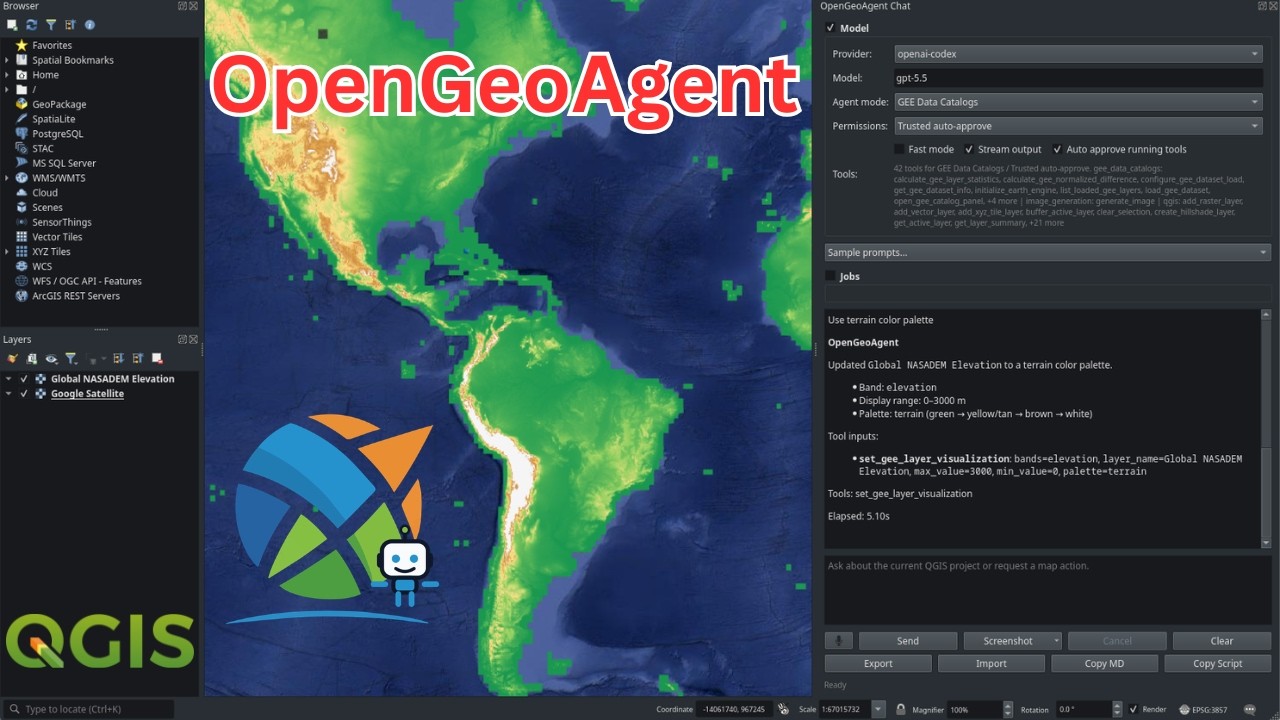
OpenGeoAgent is the QGIS plugin interface for GeoAgent. It adds a dockable, project-aware AI assistant to QGIS and connects it to GeoAgent's QGIS tool surface.
Install
Install the plugin from the QGIS Plugin Manager by searching for
OpenGeoAgent. For local development, install or symlink the plugin directory
from qgis_geoagent/open_geoagent into your QGIS plugin profile.
Open the plugin from the QGIS toolbar or plugin menu, then use Settings > Dependencies to install GeoAgent and provider clients into the plugin-managed environment. The dependency tab is workflow-aware: install Core Providers, WhiteboxTools, NASA Earthdata/OPERA, GEE Data Catalogs, STAC, or All depending on the modes you use. QGIS itself remains provided by your desktop QGIS installation. The QGIS Python runtime must be Python 3.11 or newer.
Provider Setup
OpenGeoAgent supports the same provider families as GeoAgent:
- Bedrock
- OpenAI
- ChatGPT/Codex OAuth
- Anthropic
- Google Gemini
- Ollama
- LiteLLM
- vLLM
Use the settings panel to configure API keys, hosts, model defaults, and dependency status. Vision features require a provider and model that support image inputs.
vLLM requires a separately running vLLM server. Configure the vLLM base URL and
model in settings, or set VLLM_BASE_URL and VLLM_MODEL_ID. GeoAgent tool
use requires the vLLM server to be started with tool-calling support for the
selected model and chat template.
Sample Data
You can download sample data from Source Coop here.
Video Tutorial
Chat With QGIS
The chat dock is aware of the current QGIS project and active layer. It can inspect project state, summarize layers, navigate the map canvas, add vector, raster, and XYZ tile layers, select features, run QGIS Processing algorithms, open attribute tables, and save projects.
Agent modes expose workflow-specific tools. STAC mode can read the current map
extent as a WGS84 search bbox, list catalog collections, search items, inspect
item assets, and add concrete raster asset URLs to QGIS when QGIS accepts the
asset directly. If the user does not name a catalog, STAC mode defaults to the
Planetary Computer STAC API. When the selected asset is a remote COG, the tool
passes the signed HTTP URL to QGIS through GDAL's /vsicurl/ virtual filesystem
and queues raster creation in a QGIS background task before adding the validated
layer to the project and zooming to its extent. The QGIS status bar shows an
in-progress loading message while the background task is active. This follows
the loading pattern used by the qgis-stac plugin and avoids blocking the QGIS UI
while GDAL probes the remote COG. Search results include cloud cover, spatial-fit
metadata, and preferred raster asset URLs so common load workflows can skip an
extra asset-inspection turn. The full asset URL is recorded in the transcript.
STAC load task start, success, failure, and termination messages are also
written to the QGIS message log under OpenGeoAgent STAC. STAC mode hides the
generated PyQGIS script fallback so common search setup stays on dedicated
read-only tools. The chat dock's tool availability line shows which tools are
active for the selected mode and permission profile.
Examples:
- "Summarize all layers in this project."
- "Zoom to the active layer and describe its CRS and extent."
- "Select parcels where population is greater than 10000."
- "Add this raster and set its opacity to 60 percent."
- "Use a false color composite for the active NAIP layer."
Images And Screenshots
OpenGeoAgent supports image attachments in chat messages. You can paste images from the clipboard directly into the chat input, or use the screenshot menu to attach visual context from QGIS.
Screenshot options include:
- capture the map canvas;
- select a region on the map canvas;
- capture the QGIS window;
- select a region on the screen.
Attached images appear as thumbnails in the chat. Click an image to open a larger preview, then use the save action or context menu to export it.
When a multimodal model returns image content blocks, OpenGeoAgent writes those image artifacts to a local temporary output directory, renders them inline in the chat transcript, and includes Markdown image references when copying or exporting the conversation.
OpenGeoAgent also exposes a generate_image tool for direct image creation
requests such as "generate a cat image." This tool uses the OpenAI Images API
and requires OPENAI_API_KEY; ChatGPT/Codex OAuth alone is not enough for this
API call. The default image model is gpt-image-2; choose another image model
in Settings > Model > Image Generation when needed. Generated files are saved
locally and rendered inline in the chat.
If verified image-model access belongs to a specific OpenAI organization or
project, set the optional OpenAI org/project IDs in the plugin settings so the
Images API request uses that verified context.
PyQGIS Fallback
When a request needs QGIS API functionality that is not covered by a dedicated
GeoAgent tool, the agent can use the confirmation-gated run_pyqgis_script
fallback. The script runs in the QGIS GUI context with access to iface,
project, canvas, and active_layer.
This is useful for tasks such as raster band renderer changes, labeling updates, layer tree adjustments, and other PyQGIS operations. The plugin asks for confirmation before running the script.
Use Copy Script to copy the PyQGIS code that produced the result. The copied snippet includes a QGIS-console-ready preamble so it can be inspected, shared, or rerun.
Copy And Review
The chat dock includes actions for copying the Markdown transcript and the most recent executed PyQGIS script. These are intended for reproducibility, debugging, and sharing workflows outside the plugin.
Safety
OpenGeoAgent uses GeoAgent's confirmation hook for destructive, persistent, or long-running operations. Actions such as deleting layers, saving projects, running processing jobs, and executing fallback PyQGIS scripts require user approval before they run unless the selected permission profile is Trusted auto-approve, which is the first-run default. Select a narrower profile such as Inspect only when you want to restrict tool access.